Core Commands
Here I list core commands (e.g. ps, du, find) grouped by functionality for proficient use of the shell.
Navigation and Filesystem
ls List Directory
Useful flags include -F for adding / to the names of directories, -a for printing all files and directories including hidden ones, -l gives long listing format with file permissions, user, group etc.
You can also look at the inode numbers of each file using the -i flag.
pwd Print Working Dir
pwd prints the absolute filepath of the current working directory.
pwd
Will print out something like:
/home/users/Documents
du Disk Usage
One mistake I used to make is use ls -lah to see directory sizes, which always surprisingly small, until I realized it only displayed the size of the directory entry, not its contents. To see actual disk usage of an entire directory, use du -sh where -s summarizes and -h makes the size human readable. Note that du without any arguments will evaluate the current . directory. The du command displays both directory and file sizes.
By default, the du command will evaluate the disk usage of the argument directory and evaluate all of its subdirectories and files. If you do not want to see all the subdirectories and files, the -s flag displays only the sum total disk usage of the argument directory or file.
# Show size of each subdirectory in current directory
du -sh *

# Show size of a specific directory
du -sh path/to/dir

# Show a sorted list of the biggest directories/files
du -sh * | sort -h
df Disk Free
While du tells you the size of files and directories, the df command stands for "disk free" and reports the amount of available and used disk space on mounted filesystems.
df -h # get human readable file system
An example output looks like this:
Filesystem      Size  Used Avail Use% Mounted on
none            3.9G     0  3.9G   0% /usr/lib/modules/6.6.87.2-microsoft-standard-WSL2
none            3.9G  4.0K  3.9G   1% /mnt/wslg/
C:\             476G  399G   77G  84% /mnt/c
Another common use case is checking the shared memory:
df -h /dev/shm
find Find Files
Often find is used to specifically look for files or directories. The command find can be used to search for a file by filename if you're not sure where you saved it:
find / -name "somefile.txt" 2>/dev/null
# /home/dave/Documents/somefile.txt
For partial search use asterisks in the name, also use iname for case insensitive:
find / -iname "*foo*.txt" 2>/dev/null
# can match the following:
# /home/dave/Documents/foobar.txt
# /home/dave/Documents/Foo.txt
name vs. iname
The name option matches filename by shell pattern (do not give it slashes as it only matches filename). The key difference with the counterpart iname is that iname makes the match case insensitive. The asterisk * works the same in both cases.
Use 2>/dev/null to silence permission errors - redirecting stderr. File descriptors 0 is stdin, 1 is **stdout, and 2 is stderr. So 2> redirects stderr to /dev/null which is essentially a special device that discards everything (think of it as a black hole). Writing to it just throws it away.
List contents of a directory with the -ls option:
find ~/Documents -ls
Find files by type: use -type f for regular file, -type d for directory.
find ~ -type f
This allows you to list directories in a filepath (which ls cannot do). You might want to limit the depth (because it is recursive) using the -maxdepth option:
find ~/Public/ -type d -maxdepth 1
# there is also a -mindepth N option!
You'll often do this in your current directory:
find . -type f- find current directory filesfind . -type d- find current directory subdirectoriesfind . -type l- find current directory symlinks
Other common patterns with find involve filtering by sizes:
find . -size +100M- find files bigger than 100MBfind . -size -10k- find files smaller than 10KB
Or filtering by owners:
find . -user davefind . -group stafffind . -perm 644
Combine conditions with AND (-and), OR (-o), Negation (!):
# OR
find . -type f -name "*.log" -o -name "*.txt"
# AND
find . -type f -name "*.sh" -and -executable
# NEGATE
find . -type f ! -name "*.txt"
A common use case is to find files matching a pattern and delete them all. This can be done with -delete:
find . -name "*.txt" -delete
Another common use case is to delete empty directories or files. This can be done with the -empty option:
# delete all empty directories, recursively
find . -type d -empty -delete
You can also perform actions on results via -exec for executing a command and {} where the filename would be passed in. For instance a longer way of deleting files is to call rm on each returned filename:
find . -name "*.txt" -exec rm '{}' \+
The apostrophe around the {} is just to protect the braces from shell script interpretation, and similarly the backslash as well for the ending +.
For removing matched files, you might also see:
find . -name "*.txt" -exec rm '{}' \;
The difference is that ; (escaped with backslash) calls one rm per file while + calls rm with batches of files together, which is usually faster.
The string {} is replaced by the current filename everywhere it occurs in the arguments.
As an example of how I used find, recently my error output identified some directory with problematic files. Since it did not print the exact filepath, I just used find to locate it:
find data/imagery -type d -name "20160311_464_837"
tree Directory Listing
tree is not a built-in command on bash, so you will need to do sudo apt install tree.
The command recursively lists contents of directories in depth-indented, tree like format, providing visual representation of directory structure.
Flags:
-d- list directories only-L- limit depth so-L 2to limit 2 levels deep
Example:
tree
Gets you the following output (in your current working directory):
.
├── 01-core-commands.mdx
├── 02-shortcuts.mdx
├── 03-cli-tools.mdx
└── 04-scripting.mdx

0 directories, 4 files
File Management
cp, mv, rm, touch
To copy a directory and its contents, use the -r flag:
cp -r /Users/david/docs/ /Users/david/projects/
Similarly to remove a directory and its contents, do:
rm -r dir/
chmod Change File Mode
For changing file or directory permissions.
The permissions model is key in understanding how to manage file permissions.
Each file or directory has:
- Owner (User)
- Group
- Others
Each of these can have three types of permissions:
r- Read permission (view file / list directory)w- Write permission (edit file / add or remove directory)x- Execute permission (run file / enter directory)
When you try to interact with a file, the system runs through a series of checks:
- Checks if you are user that owns the file. If so, you are granted the user owner's permission, and no further checks are done.
- If you are not user, checks group membership. If you belong to group that matches the group owner of the file, you are granted the group permission and no further checks are done.
- If neither user or owner, the others permission is granted.
Clarifying note on executables:
- Executables are usually binaries or commands, and need
xpermission to run - Scripts can be run without
xby passing to an interpreter likebash script.shorpython script.py
Clarifying notes on directory permissions:
- With
ron andxoff you can dolsbut you cannotcata file orcdinto the directory. r- You can see names of entries in directory e.g.lsw- You can modify contents of directory by adding, removing, or renaming files withrm,mv,cportouchx- You can access the entries (open orcdinto them), access any nested directories- If you do not have write permission to a directory, and a file inside has write permission, you can modify the file contents but not move or rename it.
With ls -l you will see drwxr-xr-x or -rw-r--r--. The first letter d means it is of type directory and - means a regular file.
What defines the groups?
In Linux/Unix, groups are just collections of users, managed in /etc/group.
- A user can belong to multiple groups
- A group shares permissions among its users
Create a group:
sudo groupadd hydrosm
Add a user to a group:
sudo usermod -aG hydrosm dma
See groups a user belongs to:
groups dma
# dma : cels gce lcrc hydrosm generative_hydrology BiasCorrection
Change a file's group:
chown :hydrosm file.txt
There are two ways to set permissions, one is in symbolic mode using u, g, o, or a like chmod u+x file.txt. The other is in octal mode with numbers like chmod 644 <filename>.
With symbolic mode you have the form [who] op permission [op permission ...]. The [who] is the target of permission change and can consist of symbols where u represents the user, g group, o others and a all. The operator can either be + for turning on a permission, - turning off a permission, or = to turn on the specific permission and off all others (equal to ONLY that permission). The permission symbols are r, w, x, and some unique ones s, t.
You can easily chain together symbols but it is important that you separate the operators with commas, for instance to add read but remove write permission to group and others, you can do:
chmod go+r,go-w file.txt
chmod go+rw script.sh
Giving write permission to Others is unsafe - that means any users on the system can change that file.
Setuid s:
- Known as "set-user-id-on-execution" or "set-group-id-on-execution"
- Sets the Effective User ID (EUID) of the user process that is executing a program to that of the file when it is run. Basically gives the executer the owner's privileges when running that file. The bit will be set in the user part:
rwsr-xr--. - Setgid is when
sis in the group bits:rwxr-sr--gives anyone running the executable the group's privileges. Even if Richard is not in grouphydrosm, running the program makes it run as if it belonged tohydrosm. - Setuid and setgid only applies to binary executables, so compiled programs like
/usr/bin/passwd, notshshell scripts.
chmod g+s script.sh # run program as owner
Sticky bit t:
The sticky bit only applies for directories. If the sticky bit is on, only the owner can delete or rename files in the directory, even if the directory is writable.
For example for shared writeable directories like /tmp you might see drwxrwxrwt so users cannot delete other people's files.
For instance, to turn on read, write, and execute permissions, while turning off setuid and sticky bit attributes, do:
chmod a=rwx file.txt
With octal notation, memorize 4 = read, 2 = write, and 1 = execute and sum them for the octal digit for that particular target.
Most often you will see chmod 755 <filename> because it gives the most permissions to the owner, and only read and execute permissions for everyone else. That is, rwxr-xr-x.
chown Change File Owner/Group
Change user and/or group ownership of a file. Each file has a owner and group which you can see when you do ls -l. This determines how the permission bits apply. If you are a user in the same group as the file group, you have those permissions with the file.
The basic syntax:
chown [new owner][:new group] file
For example to set the owner and group to dma and hydrosm:
chown dma:hydrosm script.sh
You can use the flag chown -R to recursively change ownership on files and directories.
ln Hard or Sym Links
Creates links to files. By default it makes hard links. For making symlinks, use ln -s <TARGET> <LINKNAME>.
Inspection
echo Print String
echo is one of the most essential built in bash commands, printing text or variable values. It prints each of its arguments to stdout separated by a single space and terminated with newline.
Examples:
# Use it to redirect output to file
echo "export PATH=$PATH:/usr/local/bin" >> ~/.bashrc
By default it does not interpret backslash escapes, so if you want the newline to be printed, you have to use the -e flag.
echo -e "This is the first line\nThis is the second line"
# This is the first line
# This is the second line
cat Concatenate
The purpose of the cat command is to concatenate files and print the result to standard output. Most people use it just to print contents of a file to stdout, for example:
cat document.txt
But you can concatenate and save, or append one file to another:
# concat and save to one file
cat document1.txt document2.txt document3.txt > combined.txt

# append one file to another
cat document1.txt >> document2.txt
Some useful cat flags of note:
cat -n file.txtnumbers output linescat -s file.txtsqueezes multiple blank lines into one
tee Stream to stdout and files
tee is a very useful command used by engineers to write the stdin stream to both stdout and one or more files simultaneously.
make 2>&1 | tee build.log

# can also save to multiple files
command | tee file1 file2 file3 >/dev/null
When you want to echo the output and write to a file at the same time use tee.
Why is it named tee? tee stands for "T-shaped" - one input followed by multiple outputs.
Most important flags are -a and -i. Use flag -a for appending to files, e.g. tee -a file.log. Use flag -i as in --ignore-interrupts to ignore SIGINT.
tee only sees what arrives in stdin. To capture the stderr as well, redirect:
command 2>&1 | tee log.txt
Here 2>&1 | tee merges stderr into stdout and then pipes both into tee.
less Viewing Files
less is for viewing text files efficiently, great for quick inspection of large files. As opposed to text editors like vim, less does not load the entire input file when called, but displays the content one page at a time.
The less viewer can come in handy with massive logs, outputs, or CSVs that you do not want to load into memory at once.
For basic navigation in the less viewer, commands are similar to vi:
- Spacebar scrolls forward 1 page
bscrolls backward 1 pagedscrolls forward half pageuscrolls backward half page- Enter or down arrow scrolls forward 1 line
- Up arrow scrolls backward 1 line
gto the top of the fileGto the bottom of the file (and123Gto go to line 123)/to search forward for a pattern?to search backward for a patternqor:qto quit
head First Lines
The head command is good for inspecting the beginning of a file, by outputting the first 10 lines to stdout:
head document.txt
You can specify any arbitrary number of lines from the begging with -n flag:
# print first 30 lines instead
head -n 30 document.txt
You can also give it multiple files at one time.
tail Last Lines
Similar to head, the tail command outputs the last 10 lines of a file to stdout. Can adjust the number with -n.
file File Type
The file tool attempts to determine what type of file it is given, whether it is a text file, an executable file or data file. It also determines the type of language found within the file.
file 02-interactivity.md
# 02-interactivity.md: Java source, ASCII text, with very long lines (428)
stat File Status
Print information regarding the file.
stat 01-intro.md
File: 01-intro.md
#   Size: 5927            Blocks: 16         IO Block: 4096   regular file
# Device: 830h/2096d      Inode: 19990       Links: 1
# Access: (0644/-rw-r--r--)  Uid: ( 1000/ davidma)   Gid: ( 1000/ davidma)
# Access: 2025-11-10 15:01:47.671001592 -0800
# Modify: 2025-09-27 11:32:23.329669113 -0700
# Change: 2025-09-27 11:32:23.329669113 -0700
#  Birth: 2025-09-27 11:32:23.329669113 -0700
The file command uses the stat system call to examine file types.
Execute (search) permission is required along all directories in the given file path for stat to access the file.
which Command Path
Tells you where an executable lives on your system.
For example,
which cat
# /usr/bin/cat
This means that whenever you run cat the shell actually executes the program /usr/bin/cat.
which only looks inside the directories specified by your $PATH environment variable. If a program is not in your PATH, which will not find it.
Text Processing
grep Print Matching Lines
The grep command searches for patterns and prints out each line that matches the pattern. There are multiple modalities of where it looks for matches.
If files are provided, looks in each provided file. If no file is provided, the -r recursive search looks at working directory, while without the -r it looks at stdin. To explicitly read stdin as a file, you can specify the file as - (though this is not necessary if you just want grep a pipe).
For instance:
qstat dma | grep dma
If you want to count the number of matching lines (instead of passing to a wc -l, use the -c flag. You can also treat the pattern as a fixed string instead of regex using -F.
grep -c "Dave" file.txt
# 17
The point of - in place of a file name:
You can read both from stdin and other files simultaneously (stdin is just treated as one of many files).
# reads both the piped file.txt and document.txt
cat file.txt | grep "pattern" - document.txt
Regex review:
\wfor letters,\dfor digits|acts as an OR between options( )allows grouping, e.g. for OR modifier, with quantifiers, etc..[ ]matches a character from a list or range of contained options[^ ]matches a character NOT in a list or range of contained options^at the start of a regex means match at start of line$at the end of a regex means match at end of line.is the match-all (any single character) wildcard?quantifies previous character or group as occurring zero or one time*quantifies previous character or group as occurring zero or more times+quantifies previous character or group as occurring one or more times{n,m}quantifies previous character or group as occurring between n and m times- Quantifiers are greedy- will always match longest possible fit.
A very useful flag is -o to make grep only print out the matches rather than the entire lines containing the matches.
echo "Dave, Door\nDash, Moon, Dave" | grep -o "Dave"
# Dave
# Dave
Basic vs. Extended Regex
With basic regex, the special characters ?, +, |, (, ), {, } are just treated as ordinary characters. To use them you must escape with backlash \?, \+. Besides this, basic regex still works with all the regex syntax.
For example: \w{3} in extended regex is \w\{3\} in basic regex.
In short, certain special characters lose meaning in basic regex if not prefixed with backslash, whereas in extended regex, characters are special unless they are prefixed with backslash. Hence, if you anticipate using lots of these special characters, prefer extended regex.
grep by default uses basic regular expressions (BRE) but can support extended regular expressions (ERE). If you want use extended regex patterns you must enable extended regex mode with -E flag:
echo "Dave, Door, Dash, Moon, Dark" | grep -o -E "D\w{3}"
# Dave
# Door
# Dash
# Dark
Another common need when grepping is to grep the surrounding lines of a match. To do this, use the -A NUM flag to specify NUM lines of context after a match, and the -B NUM flag to specify NUM lines of context before a match. For equal context on both sides you can use -C NUM for context.
# we only want the chunk around my jobs (not all server jobs)
qstat -f | grep -A 20 -B 4 dma
Sometimes you want to extract a number within a specific line of a file, but there are many numbers scattered throughout the file. You can do this by simply chaining grep and piping one grep operation into another!
grep -o "Number of successful events: [0-9]+" main_*.log | grep -o '[0-9]+'
grep is good for filtering lines and printing matches. For more complex operations where you are editing or transforming text, or scripting, use sed or awk.
fgrep Fast Grep
fgrep is essentially a variant of grep for fixed strings, when you do not need to use fancy regex expressions. Hence fgrep performs much faster than grep for matching multiple strings. Another reason to use fgrep is if you are searching for a string with many special or metacharacters, and you don't want to put tons of backslashes in the pattern - fgrep merely treats them as literals.
Matching a single pattern with fgrep is not significantly faster than grep.
awk Processing Language
The awk command executes programs written in the awk programming language specialized for text manipulation. An awk program is a sequence of patterns and corresponding actions if those patterns are matched.
To use awk, you must first understand the language. The Hello World of awk is as follows:
echo 'this line is ignored' > test
awk '{ print "Hello World" }' test
# Hello World
In this example, the script performs a single action, executing the print statement for each line of input. In this case we have a single line in the file test, so the print action is done once. Hence awk is input driven, and attempts to execute instructions for each line of input.
If you do not want awk to wait for input, the BEGIN pattern specifies actions that are performed before the first line of input is read.
awk 'BEGIN { print "Hello World" }'
# Hello World
What is actually happening here? An awk program consists of a main input loop, a routine that is executed over and over until meeting a condition that terminates it. The main input loop is executed for each line of input. Inside the main loop, you write a series of pattern/action procedures. A pattern is a rule for testing the input line to determine if the action should be applied or not. This can consist of statements, functions and expressions.
Awk also has two special routines that are executed before and after input is read, corresponding to the BEGIN and END options.
An awk script consists of 3 parts: what happens before, during, and after processing input.
BEGIN- first routine executed once before reading any input- main input loop - executed for each line of input
END- routine executed once after all input read
For example, if the input line is blank, then print "This is a blank line":
/^$/ { print "This is a blank line." }
Other rules:
/[0-9]+/    { print "That is an integer" }
/[A-Za-z]+/ { print "That is a string" }
It is common practice to put all these rules into a script which is fed into awk like so (with added comments as well):
# test.awk -- Test for string, integer, or blank
/[0-9]+/ { print "That is an integer" }
/[A-Za-z]+/ { print "This is a string" }
/^$/ { print "This is a blank line." }
Then run awk -f test.awk to take input from stdin.
An important note is that a line can match more than one rule, so if you feed in the line 4T to the above integer and string rules, you get both "That is an integer" and "That is a string" printed out for one line.
To reference fields in actions, use the field operator $, where it is followed by a number or variable identifying the position of the field. $1 means the first field, $2 for the second field, and so on, with $0 meaning entire input line. The delimiters or field separators used for extraction are white spaces by default but it can be changed with the -F flag.
awk '{ print $2, $1, $3 }' names
# Robinson John 400-240-0080
A more advanced awk program:
# blocklist.awk -- print name and address in block form
# input file -- name, company, street, city, state, zip, phone
{
    print ""    # output blank line
    print $1    # name
    print $2    # company
    print $3    # street
    print $4, $5 # city, state zip
}
This would output something like:
awk -F, -f blocklist.awk names
#
# John Robinson
# Koren Inc.
# 3050 88th Ave
# Boston, MA 88010
#
# Phyllis Chapper
# Cats Inc.
# 6060 20th Ave
# Seattle, Wa 70700
It is best practice to specify the delimiter in the awk file instead of passing it in via the -F flag:
BEGIN { FS = "," }
...
awk is great for doing arithmetic with numbers in text files. Take for example averaging:
# average five grades
# input file -- name, grade1, grade2, grade3, grade4, grade5
{
    total = $2 + $3 + $4 + $5 + $6
    avg = total / 5
    print $1, avg
}
awk -f grades.awk grades
# john 87.5
# dave 99.9
# joy 40.0
String functions are a powerful part of awk:
substr(s, p, n)- returns substring of stringsfrom positionpup to maximum length ofn. Ifnnot supplied, returns frompto the end.match(s, r)- returns either the position inswhere regular expressionrbegins, or 0 if no occurences found.
The match() function allows you to determine if a regex matches a specified string, and returns the index of the match. It sets a RSTART and RLENGTH system variables that allows you to grab the substring.
You can use the values captured by regex groups:
awk 'match($0, /N=([0-9]+)/, arr) {print arr[1]}' file.txt
A good example of how I used awk is when I wanted to take all my log files main_*.log and extract a number from each and sum them up:
# sum.awk -- calculate the total number of events sampled from script
match($0, /Number of successful events sampled from this run: ([0-9]+)/, m) { sum += m[1] }
END { print sum }
grep "Number of successful events" main_*.log | awk -f sum.awk
sed
cut Slice Text
The cut command prints selected parts of lines to stdout - it is great for slicing text data.
Typical use cases:
- Extract specific columns from CSV file
- Parse system logs or outputs
- Preprocess data in shell script before passing to
sort,uniq,awketc.
Most common to use the flag -f to specify which field and -d to specify the field delimiters (default is TAB).
For example, to extract the first column from the CSV:
cut -d',' -f1 data.csv
sort Sort Lines
Use sort to sort lines of text files. No file or file - will read in stdin. It sorts by default alphabetically. For numerical sorting, you must use the flag -n.
Common flags include -r to reverse the sorting, and -u to output only unique lines. So you will often see:
sort -r -u file1.txt
Another common use case is to compare human readable file sizes 2K, 1G etc. To do that, use the flag -h for sorting human readable file sizes:
sort -h file.txt
You can also set delimiter (besides default blank to nonblank) using -t and sort by column using the -k or key flag:
# Need , delimiter for csv
# KEYDEF=2,2n means 2nd column and numerical type
sort -t, -k2,2n data.csv
comm Compare Sorted
The comm command in the form comm FILE1 FILE2 compares sorted files FILE1 and FILE2 line by line. Use the flags -1 to suppress col 1 (lines unique to FILE1), -2 to suppress col 2 (lines unique to FILE2) and -3 to suppress col 3 (lines that appear in both files).
One common use case is to compare the lines of two separate outputs. For instance, if I want to see what subdirectory names are shared between folder1 and folder2, I can do the following:
comm -12 \
<(find folder1 -mindepth 1 -maxdepth 1 -type d -printf "%f\n" | sort) \
<(find folder2 -mindepth 1 -maxdepth 1 -type d -printf "%f\n" | sort)
The syntax <(...) or >(...) is process substitution and allows you to treat a process' input or output as a filename. This allows you to pipe the stdout of multiple commands in a single line.
With <(...) what happens is that the output of the command is evaluated asynchronously, and the value inside is saved to a temporary file. The expression then returns the filename, typically dev/fd/63 which works with any commands that expect FILE.
The difference between <(command) and >(command) is that <(command) provides the output of the command as a file, while >(command) provides what is written to the file as input for the command inside.
uniq Repeated Lines
The uniq command filters out matching lines adjacent to each other. By default sequential matching lines are merged to the first occurrence. NOTE: it does not detect repeated lines unless they are adjacent! Either sort the input first or use sort -u without uniq.
diff Compare Lines
When given two args (files or directories) diff shows what changed between the two, comparing line by line. It outputs lines added, removed or modified.
The default classic format is quite difficult to read. The -u flag toggles unified format which is much more readable with + and - lines, and shows context lines (unchanged lines around differences). This is the same format as git diff but for arbitrary files on the filesystem.
Git actually uses diff under the hood! git diff is just a diff wrapper.
wc Count
The bash command wc is really useful for doing counting. It can count the number of lines, words, bytes in the input or a given file. Without options it prints all three: byte counts, word counts, and line counts.
To limit to specific count, use flags:
-lto print only newline counts-wto print only word counts-c(short for--chars) to print only byte counts
For file input instead of a pipe, pass in the filenames after the options.
For instance, if you wanted to count the number of files in a folder matching a regex from find, you can pipe the output into wc:
find data/labels -type f -name "label_*.tif" | wc -l
For number of files in the current folder at depth 1:
find . -maxdepth 1 -type f | wc -l
Networking
curl Transfer URL Data
The tool curl is commonly used to transfer data from and to a server using URLs. It supports a wide range of protocols from HTTP, HTTPS, TFTP, FTP, DICT, SCP, etc.
The basic form is curl [URL] where the URL syntax is protocol dependent. curl will determine the protocol based on the leading protocol:// scheme, so https:// tells curl that it is HTTPS protocol.
By default curl writes the received data to stdout, but usually you want to save to file. For output, the -o file.txt saves as a specific file, otherwise the -O flag will save automatically using the remote filename. In scripts it's useful to use -s silence flag to avoid printing the progress bar.
For instance, to download the AWS CLI, you would first get the zip file using:
curl "https://awscli.amazonaws.com/awscli-exe-linux-x86_64.zip" -o "awscliv2.zip"
This saves awscliv2.zip in the cwd. If you want to specify an output directory, you can also use the --output-dir option, e.g. curl https://example.com --output-dir "tmp" -O
curl is a tool for general client-server requests. Hence it not only supports the GET request (the default), but also supports POST, PUT, DELETE and more. You can change the request method using the -X, --request flag.
curl -X "DELETE" https://example.com
It is common to send data in a POST request to an http server. This can be done with the --json option which sets the method and header without needing -X:
curl --json '{ "drink": "coffe" }' https://example.com
The header flag -H can be useful to include extra header information on a request, and you can do -H multiple times. This allows curl to provide authentication options such as a bearer token:
curl -H "Authorization: Bearer $TOKEN" \
    -H "Accept: application/json" \
    https://api.example.com/user
curl also supports globbing with the URLS, where lists in braces or brackets (ranges) can denote multiple URLs at once. In this case you might also need to use # followed by the number in the file name that is saved for output file names:
# hashtag is replaced by the string being fetched
curl "http://{one,two}.example.com" -o "file_#1.txt"
wget
ping
netstat
ssh
autossh Maintain SSH
The command autossh is a wrapper around ssh that monitors and restarts ssh sessions and tunnels that are dropped.
For instance, instead of trying to keep a reverse SSH session up with ssh -R 8642:localhost:8642 ai4ai, you can maintain the SSH session indefinitely via:
autossh -M 0 -o "ServerAliveInterval 30" -o "ServerAliveCountMax 3" -N -R 8642:localhost:8642 ai4ai
The useful flags are:
-M port[:echo_port]sets the base monitoring port. This is typically disabled via setting the monitoring port to0, hence-M 0above.
These are standard SSH flags:
-oflag is used to specify options in format in the configuration file.-Ndo not execute a remote command. When the goal is just to establish a reverse SSH tunnel you don't need a shell on the remote side this avoids setting up a remote shell or command on server side when SSH is made.-R [bind_address:]port:host:hostportargument for remote port forwarding (aka reverse SSH)
scp
System Monitoring
ps Process Snapshot
The command ps displays information about a selection of active processes. For repetitive live updates of processes, use top (see below).
PID (Process ID) = unique ID of running process, PPID (Parent Process ID) = the parent process that created the current process.
By default ps selects processes with same Effective User ID (EUID) as user and corresponds with the same terminal session where invoked. Note that consequently this is just a subset of the processes associated with your user.
Example: say you log back onto the login node and want to check back on the processes that you launched and make sure they were not killed. Use the -U flag to filter by Real User ID (RUID).
ps -U $USER
RUID vs. EUID
Real User ID (RUID): The user who started the process. If you are logged in as user dma on swing and run script.py, the process has your RUID. The shell you start has your RUID, and all processes launched from the shell inherit that RUID.
Effective User ID (EUID): Determines what permissions the process has, e.g. a program may belong to a user but run with elevated EUID like root. If the EUID is your user, then it can only do what you can do. If the EUID is root, it can do pretty much anything.
Every process has an RUID and EUID. The RUID tells the system who started the process, and the EUID tells the system what the process is allowed to do. When a process tries to access a file, socket, or device, the kernel first checks its EUID against the file's permissions!
RUID == EUID means no privilege escalation, but higher EUID can allow for limited & controlled privilege escalation (see note).
When a binary has the setuid bit set in file permissions, e.g. -rwsr-xr-x (s instead of x in owners execute permission), when program runs, its EUID is set to the file owner instead of the user who ran it.
Thus /bin/ping which is owned by root and has the setuid bit when run by a user can open raw sockets (something only root has access to).
Other important flags to know as a developer:
For filtering, use:
-p <pid>to filter for a specific PID-C <command>to filter by command name e.g.ps -C pythonfor python processes--ppid <pid>to show processes with matching parent PID good for debugging forked daemons or processes
For more info, use:
-ffor full format which includes the command args to the process-Ffor extra full format
A power user formatting is to use -o which can enable you to show additional usage info. By default, -f and -F do not show cpu usage and memory usage:
ps -U $USER -o pid,ppid,cmd,%cpu,%mem --sort=-%cpu
For BSD style printout, use aux (a = all users, u = show user, x = include processes without controlling terminal). You often will see this in the form of ps aux | grep <name>.
To see processes in tree view for parent/child relationships, use -ejH.
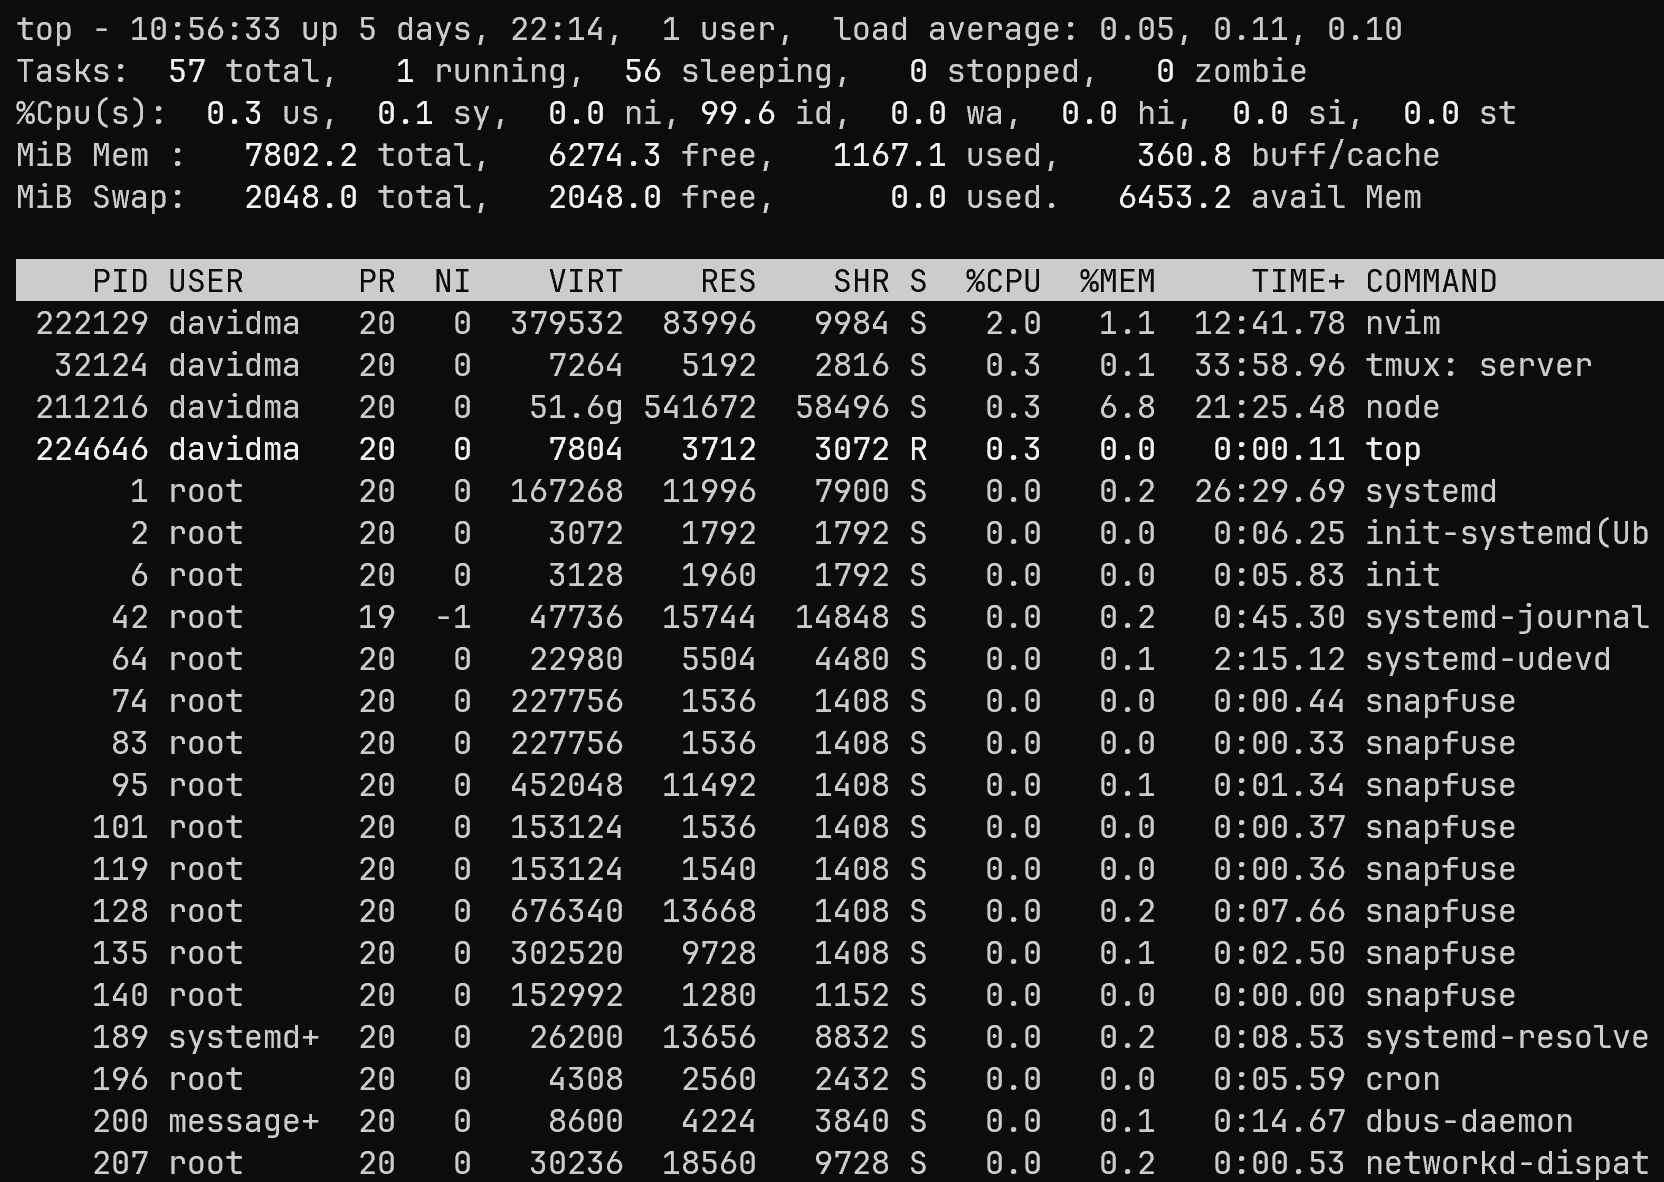
top Interactive Process Viewer
Compared to ps, top is more interactive and displays info continuously (as opposed to ps that just prints out a single snapshot). Think of this more like a task manager program on CPU and memory usage.
top also helps you see which processes are most active as it ranks them by processor usage.
htop Enhanced Interactive Process Viewer
Similar to top but allows scrolling vertically and horizontally and you can interact using a mouse.
You can observe all processes running on the system, along with their command line args, view them in tree format, select multiple processes and act on them all at once. Hence you can act on processes (killing etc.) without entering their PIDs.

Typically on HPC, I run this on the compute node to investigate memory problems:
# dma is my user id
htop -u dma
kill Terminate Process
The kill command sends a specified signal to a specified process or group of processes.
With no specified signal, TERM signal is the default signal, meant to terminate the process (preferred over the KILL signal as TERM allows the process handler to perform clean up before terminating).
# Sends SIGTERM
kill pid
If the TERM signal does not terminate the process, a KILL signal can be sent via
# both send SIGKILL
kill -KILL pid
kill -9 pid
uptime System Status
Prints one line display of the current time, how long the system has been running, how many users are logged on, and the system load averages over the past 1, 5, 10 mins. The load averages are the average number of processes in a runnable (using or waiting for CPU) or uninterruptable state (waiting for I/O).
A load average of 1 on a single CPU system means it is completely loaded the entire time, while on 4 CPU system means only 25% load, 75% idle.
uptime
#  18:14:49 up 1 day,  7:51,  2 users,  load average: 0.26, 0.15, 0.10
In pretty format with -p:
uptime -p
# up 1 day, 7 hours, 51 minutes
free System Memory
This is a useful debug command for checking memory. The command displays the amount of free and used memory in the system.
free -h
Example output:
               total        used        free      shared  buff/cache   available
Mem:           1.0Ti        26Gi       973Gi        60Mi       7.4Gi       976Gi
Swap:             0B          0B          0B
The shared column includes tmpfs such as /dev/shm shared between processes. The buff/cache column is memory used for filesystem buffers or cache (speeds up disk I/O by caching files in RAM). For what actual memory you have free, look at available column.
watch Run Repeatedly
Use watch -n to monitor any command output over time.
I often find myself checking the output of a command regularly for changes. For instance, when monitoring my shared memory utilization on a compute node with df -h /dev/shm I have to type it over and over to see if the usage jumps. However, this can be automated with watch.
The watch command lets you run a command automatically per specified interval with the -n interval flag (in seconds):
# print shm usage every 1s
watch -n 1 df -h /dev/shm
Note that quotes can be important in controlling parsing for more complicated commands. The rule of thumb is that if a command takes another command as input, you might need to quote it:
A common mistake is to include more than one command e.g. shell pipelines in the command arg like watch -n 1 qstat | grep dma. This will not work.
Chained bash commands must be placed inside quotes like so:
watch -n 1 "qstat | grep dma"
Execution
sudo Superuser Do
A binary program that can be invoked to run a command as another user (by default root). Many operations that require root privileges (installing packages, editing system configs) mean that you need to temporarily elevate privileges with sudo in order to run them.
Commmonly you might see:
sudo apt install python3-pip # run apt package installer with root privileges
sudo nano /etc/nginx/nginx.conf # edit system config
Only give sudo access to trusted users as it gives full control over the system. Be careful with recursive deletes like sudo rm -rf /.
source Execute in Current Shell
The source command runs a script in the current shell instead of launching a new shell. Usually running a script in bash spawns a new child process and runs the script in that new environment, meaning once it exits, any variables or environment variables in the script are lost. With source any variables, functions, or PATH changes stay active after the script finishes, hence it is often used for environment setup.
source filename
You can also use its abbreviation which is .:
. filename
What is happening when you do source activate myenv is that the activate script modifies the PATH or PYTHONPATH variable, so source ensures those exports happen in the current shell.
exec Execute Program
To restart the shell e.g. if you have just installed conda, use exec:
exec $SHELL
This replaces the current shell with a brand new instance. You can also get a similar effect by reloading configurations and refreshing settings using source ~/.bashrc.
What is the environment variable $SHELL? It stores the shell path. If you do echo $SHELL you get /bin/bash, so exec $SHELL executes the shell program specified by /bin/bash as a new program, replacing the old program.
xargs Execute from Stdin
An essential bash command, xargs reads items from stdin and executes a provided command with initial arguments followed by the items read in as arguments.
Commands like find, cat, grep pipe files and strings through stdin, but commands like rm, cp, mv, git expect arguments, not piped input. Hence xargs bridges the gap between them by converting piped stdin into arguments for subsequent command.
Thus, you can do something like:
# delete all log files
find . -name "*.log" | xargs rm
Which converts the files found by find into an rm file1.log file2.log ... call.
By default xargs splits the args on any whitespace (blanks and newlines) and treats consecutive whitespaces as a single delimiter. Hence you must be extra careful when piping in filenames with whitespaces like my file.txt as xargs will treat my and file.txt as separate arguments and send them into the command.
In these cases pass in null character delimited filenames (e.g. -print0 option from find) and use the -0 flag which recognizes null character as delimiter:
find . -type f -print0 | xargs -0 rm
The -n flag specifies the max arguments per command so -n 1 will run the command 10 times for 10 arguments.
# NOTE: xargs by default runs echo command
echo "a b c" | xargs -n 1
# a
# b
# c
A common thing you will also see is the -I {} placeholder syntax to insert items at specific points instead of the default behavior of appending all args to the end. For instance:
echo "a b c" | xargs echo file:
# file: a b c
echo "a b c" | xargs -n 1 -I {} echo file: {}
# file: a
# file: b
# file: c
nohup No Hang Up
Invokes a command immune to hang ups, i.e. it will ignore the SIGHUP signal. By default outputs are routed to nohup.out. The structure is nohup utility [args...]:
# Run the python script in the background, ignore hang up signal
nohup python train_models.py &
Useful Utilities
strace Trace Sys Calls
A great tool for debugging and diagnostic is strace which runs a command, intercepts all system calls and signals a process receives, and prints them out. It is actually quite clear info because it shows you in sequence the name of the system call made by the program, its arguments, and the returned value.
What is a system call?
In Linux, a system call aka syscall makes up the interface between the user program and the Linux kernel. It lets the user perform privileged instructions.
For instance, fork, execve, open, read, write are all system calls.
An snippet of the strace output run on the bash command strace cat test.txt:
execve("/usr/bin/cat", ["cat", "test.txt"], 0x7fff6b0c9ac8 /* 46 vars */) = 0
brk(NULL)                               = 0x5bd3f4e0e000
arch_prctl(0x3001 /* ARCH_??? */, 0x7ffd7e4a1f00) = -1 EINVAL (Invalid argument)
mmap(NULL, 8192, PROT_READ|PROT_WRITE, MAP_PRIVATE|MAP_ANONYMOUS, -1, 0) = 0x7d54d957a000
access("/etc/ld.so.preload", R_OK)      = -1 ENOENT (No such file or directory)
openat(AT_FDCWD, "/etc/ld.so.cache", O_RDONLY|O_CLOEXEC) = 3
newfstatat(3, "", {st_mode=S_IFREG|0644, st_size=38388, ...}, AT_EMPTY_PATH) = 0
mmap(NULL, 38388, PROT_READ, MAP_PRIVATE, 3, 0) = 0x7d54d9570000
close(3)                                = 0
parallel Run in Parallel
The GNU utility parallel is one of the most powerful tools to learn. It allows you to easily run multiple jobs in parallel on the command line. It is written to be similar to xargs in terms of options. The output from parallel is also ensured as the same as you would get from a sequential run of the command.
For example, if you wanted to compress all html files using gzip, you can do it in parallel:
find . -name '*.html' | parallel gzip --best
Say you wanted to generate thumbnails for each .jpg file, but it is extremely slow sequentially:
convert -geometry 120 foo.jpg thumb_foo.jpg
Then you can simply do:
ls *.jpg | parallel convert -geometry 120 {} thumb_{}
jq
Others
test Evaluate Conditional
The built-in test command evaluates a conditional expression.
You can use this a variety of ways, for instance, to compare two numbers:
test 18 -gt 2 && echo yes
# yes
A short hand for test is to use the brackets [] syntax:
[ 18 -gt 2 ] && echo yes
# yes
The [] is more portable but [[]] is preferred on modern systems as it handles expressions that evaluate to null automatically.